What Are PU Quick Fittings? Specs, Working Principle, and Installation in 3 Minutes
In the world of precision equipment and pneumatic systems, you may often hear the term PU quick fitting. But what exactly is a PU quick fitting, and how do you choose the right specifications? In this guide, we will walk you through the specs, working principle, and installation method of PU quick fittings so you can install them correctly and maintain the sealing performance, stability, and safety of your pneumatic system. Proper installation also helps prevent common issues such as air leakage and tube blow-off.
Table of Contents
What Is a PU Quick Fitting?
A PU quick fitting, short for polyurethane quick fitting, is a connection component specifically designed for PU air tubing. Its biggest advantage is plug-and-play convenience. Without using specialized tools, the operator only needs to insert the PU tube into the fitting to create a highly airtight connection. This design greatly simplifies both installation and maintenance.
Key advantages of PU quick fittings include the following:
Extreme time-saving efficiency
Traditional threaded or clamp-type fittings require wrenches and extra time for tightening. In contrast, the push-to-connect design of a PU quick fitting reduces connection time from several minutes to just a few seconds, significantly improving assembly and maintenance efficiency.
Excellent sealing performance
The internal O-ring seal and collet structure are engineered for precision. Once the PU tube is properly inserted, the fitting can maintain a high level of airtight sealing under standard working pressure, helping prevent energy loss and pressure drop in the system.
Reusable design
High-quality PU quick fittings can withstand thousands or even tens of thousands of insertion and removal cycles while maintaining reliable sealing performance. The internal stainless steel collet grips the tube wall firmly, helping prevent loosening or sudden tube blow-off caused by vibration or pressure fluctuations.
Lightweight and cost-effective
Compared with fully metal fittings, PU quick fittings with an engineered plastic body are lighter in weight, which supports lightweight machine design. Standardized production also makes them highly cost-competitive, reducing the total cost of system installation.
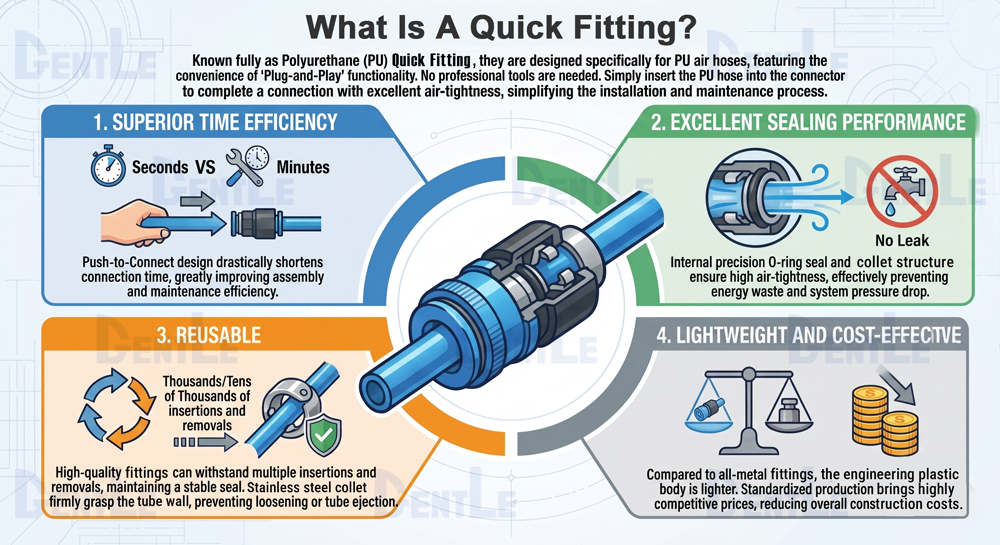
What Is A Quick Fitting?
Working Principle and Specifications of PU Quick Fittings
PU quick fittings achieve fast connection and reliable sealing through the coordinated action of three key internal components: the release ring, collet, and O-ring seal. Together, these parts create a self-locking and sealing mechanism.
How PU Quick Fittings Work Internally
- Collet
- Material: Usually made of stainless steel for excellent elasticity and hardness.
- Function: The collet contains multiple inward-facing gripping teeth. When the PU tube is inserted, these teeth expand slightly. If the tube is pulled outward, the reaction force causes the teeth to bite more deeply into the tube wall, creating strong holding force and preventing the tube from slipping out or blowing off under pressure.
- O-ring seal
- Material: Most commonly made of NBR (nitrile rubber), which offers good oil resistance and elasticity for general air applications. In special environments, FKM (Viton) or other materials with higher temperature or chemical resistance may also be used.
- Function: After the PU tube passes through the collet and is fully inserted, it comes into tight contact with the internal O-ring. The elasticity of the O-ring fills the tiny gaps between the tube wall and the fitting body, forming an airtight barrier that prevents air leakage.
- Release ring
- Material: Typically made of engineered plastic and designed in a ring or oval shape for easy pressing.
- Function: When the user needs to remove the PU tube, pressing the release ring inward pushes the collet open and releases its grip on the tube wall, allowing the tube to be removed easily.
PU Quick Fitting Specifications Explained
- Tube outer diameter: The tube outer diameter determines the size of the push-in port and must match the PU tube exactly.
- Common metric sizes: 4 mm, 6 mm, 8 mm, 10 mm, 12 mm, 14 mm, 16 mm
- Selection key: A size mismatch will directly cause installation failure or serious air leakage. For example, a PU tube with a 6 mm outer diameter must be paired with a 6 mm PU quick fitting.
- Thread specification: This applies to fittings with a push-to-connect side on one end and a threaded side on the other, allowing the fitting to be secured into equipment such as air cylinders or solenoid valves.
- Common thread types
- PT (RC): Tapered pipe thread commonly used in Asia
- NPT: National Pipe Taper thread commonly used in North America
- G (BSPP): Parallel pipe thread commonly used in Europe, usually requiring a gasket for sealing
- Common thread sizes: 1/8", 1/4", 3/8", 1/2"
- Selection key: The thread type and size must match the threaded port on the equipment exactly. Otherwise, the fitting cannot be installed properly or may cause air leakage.
How to Install PU Quick Fittings in 6 Steps
Correct installation is the most effective way to prevent PU quick fitting air leaks. The process can be divided into two main parts: installing the push-to-connect side and installing the threaded side.
1. Installing the Push-to-Connect Side (Connecting the PU Tube)
Step 1: Make sure the PU tube end is cut flat and square
A smooth 90-degree cut is the first line of defense against damaging the internal O-ring. A scratched O-ring is one of the most common causes of air leakage.
- Recommended tool: Use a dedicated tube cutter or a sharp utility knife
- Do not use: Side cutters, scissors, or similar tools, because they can crush the tube wall and leave the cut end deformed, uneven, or burred
Step 2: Insert the PU tube straight and fully into the fitting
Hold the PU tube and align it with the center of the fitting. Push it in steadily and straight. You will usually feel light resistance first, followed by a second, more noticeable resistance. Continue pushing until the tube reaches the bottom and you feel a clear stop.
A practical tip is to mark the tube about 15 mm from the end with a pen before insertion. Once the tube is fully inserted, the mark should be nearly invisible, helping you confirm that the tube has gone all the way in.
Step 3: Gently pull outward to confirm the connection
After insertion, gently pull the PU tube outward to make sure the collet has locked onto the tube wall securely. A properly installed fitting should feel firmly locked in place and should not move under a light pull.
PU quick fittings deliver fast connection and reliable sealing through the coordinated function of three key internal components. The release ring, collet, and O-ring seal work together to create a self-locking, airtight sealing mechanism.
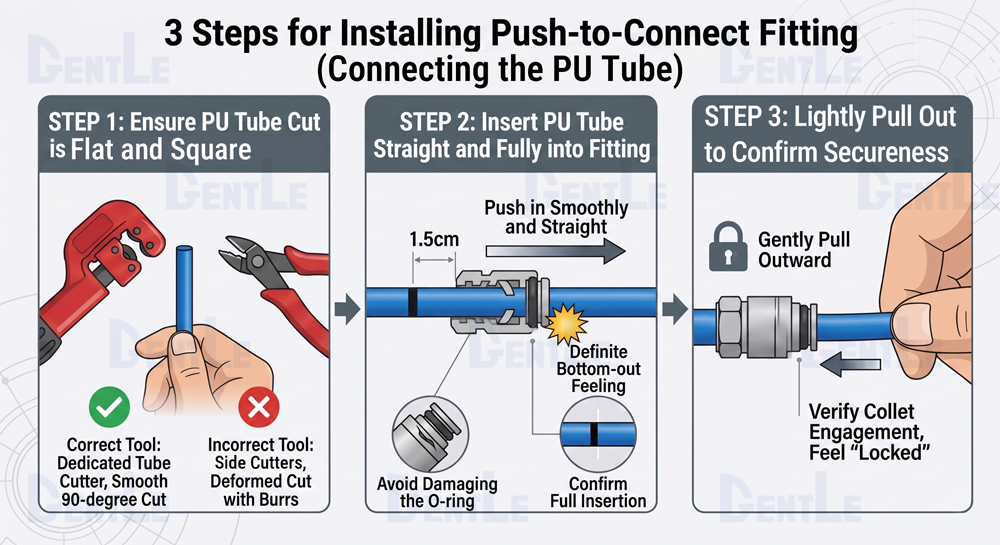
3 Steps for Installing Push-to-Connect Fitting
2. Installing the Threaded Side
Step 1: Confirm the thread type and size
Double-check that the fitting thread specification, such as PT 1/4, matches the threaded port on the equipment exactly. If the specifications do not match, installation will fail.
Step 2: Wrap thread seal tape correctly
Wrap the thread seal tape clockwise when viewed from the threaded end toward the fitting body. This ensures that the tape tightens as the fitting is screwed in, rather than loosening.
In general, 5 to 8 wraps are recommended, with even thickness throughout.
Step 3: Tighten to the correct level
First, screw the fitting in by hand clockwise until it can no longer be turned easily. Then use a properly sized wrench to tighten it an additional 1/4 to 1/2 turn.
⚠️Important: Do not overtighten. Excessive force on plastic-body fittings can crack the threaded section, while overtightening metal fittings can damage the equipment threads. Either problem can lead to permanent air leakage.
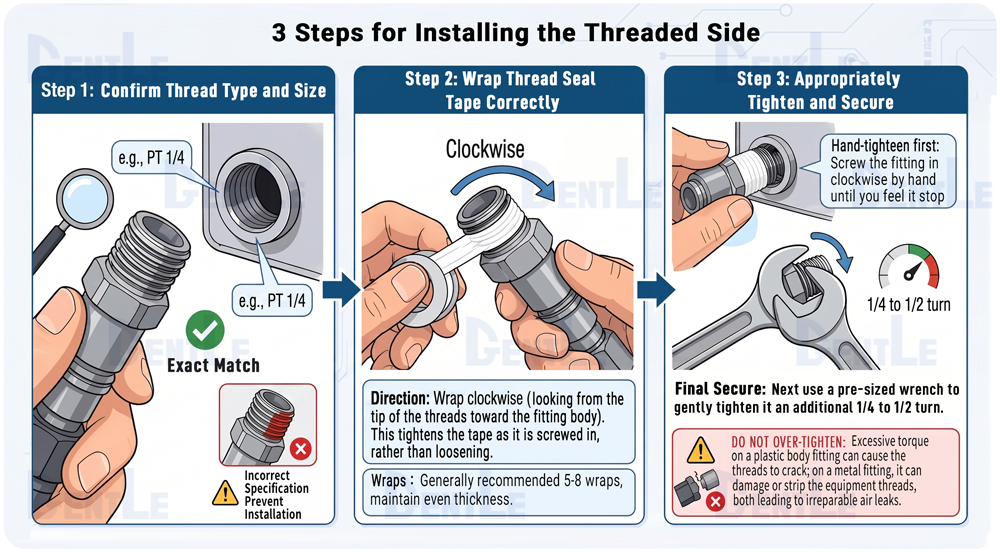
3 Steps for Installing the Threaded Side
Three Core Rules for Reliable PU Quick Fitting Installation
To install a PU quick fitting properly and maintain long-term leak-free performance, remember these three essential principles:
- Cut the tube end flat
- Push the tube in all the way
- Tighten the thread moderately
By following these steps, you can handle the installation of various PU quick fittings with confidence.
Conclusion
PU quick fittings are not only important components for improving the assembly efficiency of pneumatic systems, but also critical to the overall sealing reliability and operational safety of the pipeline. By understanding the internal structure, specification differences, and proper applications of PU quick fittings, and by following standard installation procedures, you can effectively reduce the risk of air leaks, loose tubing, and unexpected tube blow-off, ensuring long-term stable equipment operation.
Further Reading:
What's a Pneumatic Quick-Connect Fitting? A Comprehensive Guide to Materials & Installation Methods!
What Are Pneumatic Quick-Connect Fittings? Key Specifications, Sizes, and Types Explained!