In pneumatic systems, pneumatic quick fittings are one of the key components used to connect equipment and tubing. But do you know how to install quick fittings correctly? The quality of installation directly affects the overall sealing performance of the system, and proper installation is essential for improving operating efficiency. In this guide, we will quickly walk you through 8 correct installation steps, while also explaining the practical uses and common types of pneumatic quick fittings so your system can operate safely and efficiently.
Table of Contents
Uses and Types of Pneumatic Quick Fittings
Pneumatic quick fittings are designed to improve the connection and maintenance of pneumatic tubing systems. Their core applications mainly include the following four areas.
Use 1: Fast connection and disconnection
Pneumatic quick fittings allow users to connect or disconnect the air source quickly without tools or thread disassembly. In applications that require frequent production line changes, equipment maintenance, or fixture replacement, this can significantly improve work efficiency and reduce downtime.
Use 2: Maintaining high sealing performance
High-quality fittings provide excellent sealing performance and effectively prevent compressed air leakage. Air leaks not only cause unstable system pressure and abnormal equipment operation, but also waste energy.
Use 3: Improving maintenance efficiency
When machines need servicing or tubing must be replaced, the job can be completed with a simple push-in or pull-out action in just a few seconds. This greatly simplifies the maintenance process.
Use 4: Ensuring operational safety
A secure connection structure helps prevent tubing from loosening or blowing off under high pressure, reducing the risk of injury to on-site personnel.
► Comparison of Pneumatic Quick Fitting Types
| Item | Fully Non-Threaded Type | Partially Threaded Type |
| Structural feature |
All ports are push-to-connect with no threads |
One port is threaded, while the other ports are push-to-connect |
| Main function | Used for tube-to-tube connection, branching, or direction change | Used to connect tubing to equipment bodies such as air cylinders or solenoid valves |
| Typical applications | Tube extension and inline connection | Inlet and outlet ports on air cylinders, FRL units, and other pneumatic components |
| Airflow direction change, such as elbow routing | Air source ports on machine panels or mounting plates | |
| One-to-two or one-to-multiple branching, such as tee or Y fittings | Applications where one side must be fixed to equipment and the other side must allow quick tube insertion and removal | |
| Tubing on moving parts or robotic arms | - | |
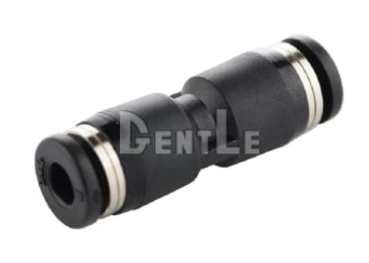
| Common styles | Straight union | Male straight push-in fitting |
| Elbow fitting | Male elbow push-in fitting | |
| Tee fitting, Y fitting | Male tee push-in fitting | |
| Swivel fitting | - | |
| Installation advantages | No tools required at all | One side can be securely fastened to equipment for better stability |
| Seals by simply inserting the tube | The other side keeps the convenience of push-to-connect installation for quick line changes and maintenance | |
| Extremely fast and time-saving when replacing tubing | High sealing performance |

How to Install Pneumatic Quick Fittings
Different fitting types require different installation methods, and any mistake can lead to air leakage or connection failure. The installation steps are explained below.
1. Installation Steps for Fully Non-Threaded Types
Step 1: Cut the tube into a flat 90-degree end
Use a dedicated tube cutter or a sharp blade to make sure the tube end is flat and cut at a true 90-degree angle. Uneven or angled cuts can easily scratch the internal O-ring seal during insertion and cause air leakage.
Step 2: Insert the tube straight into the push-in port
Push the tube straight and firmly into the push-in port until you feel a clear stop. About 90% of air leak issues come from tubes not being inserted all the way.
Step 3: Perform a leak test
After installation, carry out a leak test immediately to verify that the connection is successful. Once the system is pressurized, you can use one or more of the following methods:
- Listen for leaking air: Place your ear near the fitting and check for a hissing sound.
- Apply soap solution: Apply soapy water to the connection area between the fitting and the tube and look for bubbles.
- Pull-check the tube: Gently pull the tube again to confirm that the connection remains secure under pressure.
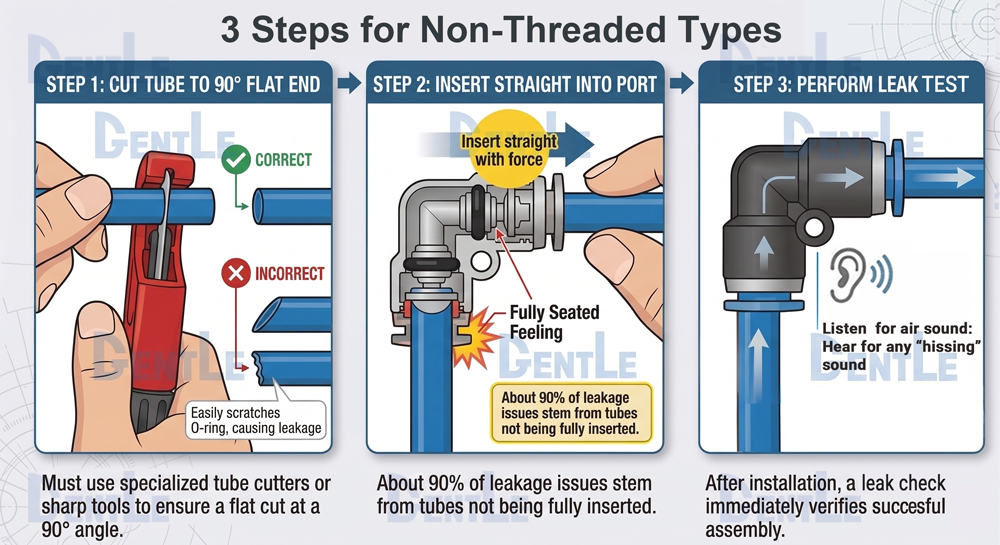
3 Steps for Non-Threaded Types
2. Installation Steps for Partially Threaded Types
Step 1: Confirm the thread size and specification
Before installation, make sure the female thread on the equipment side and the male thread on the fitting match exactly. Different thread standards, such as PT, NPT, and G threads, have different thread angles and pitches, and mixing them can cause leakage.
Common specifications: In Taiwan and many parts of Asia, the most common standard is PT thread (also called RC thread), with typical sizes including 1/8", 1/4", 3/8", and 1/2".
Step 2: Wrap thread seal tape on the threaded end
Except for fittings with pre-applied thread sealant, most tapered threads, such as PT threads, require thread seal tape to fill the gaps between threads and achieve airtight sealing.
How to wrap it:
- Wrap in the same direction as the tightening direction, usually clockwise
- Apply about 5 to 8 wraps evenly and neatly
- Only wrap the threaded section; do not let the tape extend beyond the thread end or block the air passage, or debris may enter pneumatic components and cause damage
Step 3: Tighten the threaded end into the equipment
Use the correct tool for tightening. Excessive torque may crack plastic-body fittings or damage the threads on the equipment side.
First, screw the fitting in by hand until resistance is felt. Then use an open-end wrench on the hex section of the fitting and tighten it gently. In most cases, after hand-tightening fully, an additional 1/4 to 1/2 turn with a wrench is enough to achieve a good seal.
Step 4: Insert the tube into the push-in end
Use the same method as for the fully non-threaded type. Insert the tube with a flat cut straight into the push-in port, make sure it goes all the way in, and gently pull it to confirm that it is secure.
Step 5: Test the sealing performance
After pressurizing the system, test both the threaded connection and the push-in connection by listening for leaks or applying soap solution. Pull the tube again to confirm that it is firmly secured.
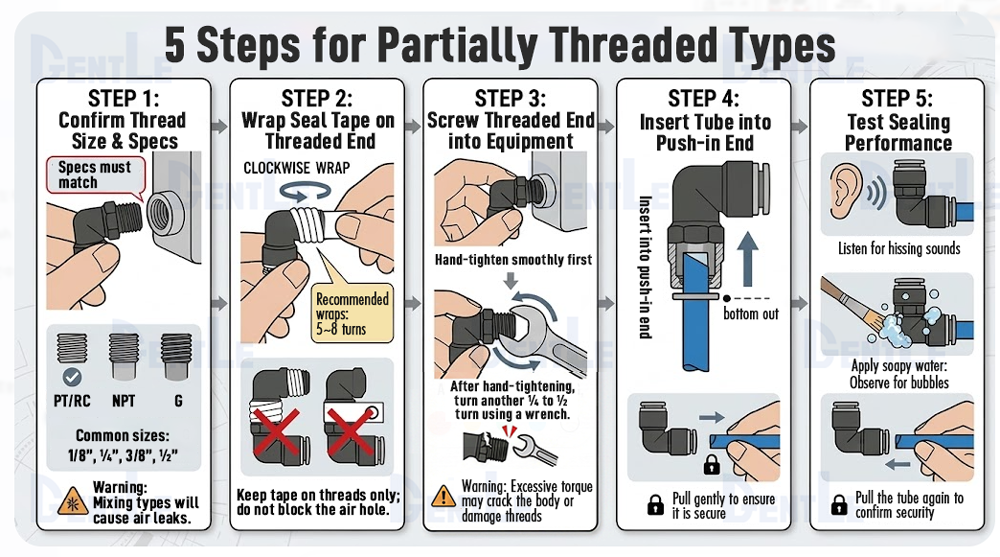
5 Steps for Partially Threaded Types
Five Important Precautions When Installing Pneumatic Quick Fittings
There are still several common mistakes to avoid during actual installation. The key precautions are summarized below.
Precaution 1: Make sure the tube is inserted all the way
If the tube is not fully inserted, the internal collet cannot grip it completely, and the O-ring cannot form an effective airtight seal. Under low pressure, this may only cause slow leakage, but it still leads to energy loss.
Precaution 2: The threaded end must use the same specification
Different countries and regions use different thread standards, such as PT (RC), NPT, and G (PF). Their thread angles, pitches, and sealing methods are all different. Forcing mismatched threads together will not create a reliable seal, even if you use extra thread seal tape.
Precaution 3: Replace aged tubing
Tubing, especially PU tubing and nylon tubing, will age over time due to temperature, UV exposure, and contact with chemicals. Aged tubing loses its original elasticity and dimensional accuracy, becomes less flexible, may crack at bends, and can develop surface cracks that become leakage points.
Precaution 4: Keep insertion and removal straight without twisting
The internal structure of pneumatic quick fittings is designed for straight-line motion. Twisting or angling the tube during insertion or removal causes unnecessary wear on the internal parts.
Precaution 5: Always perform a leak check after installation
Skipping this inspection can allow a defective installation point to become a long-term system problem, causing the air compressor to start frequently, system pressure to fluctuate, and product quality to decline.
Conclusion
Installing pneumatic quick fittings is not a one-step task. It requires identifying the fitting type, following the correct installation procedure, and performing proper inspection. By fully understanding the differences in application and structural design of pneumatic quick fittings, and by carefully following standardized installation steps and precautions, you can effectively reduce the risk of air leakage, loose tubing, and equipment malfunction.
Further Reading:
What's a Pneumatic Quick-Connect Fitting? A Comprehensive Guide to Materials & Installation Methods!